
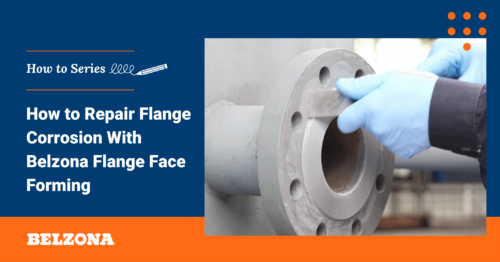
Belzona’s flange protection systems eliminate the need for conventional cut and weld methods involving hot work and allow for a simple application in emergencies, especially in areas with limited access, such as on offshore platforms. Therefore, the Belzona Flange Face Forming Kit is a unique repair kit developed to aid flange face protection by combating the common problems with mating surfaces of flanged joints, such as heat distortion, flange corrosion, and erosion. In conjunction with Belzona 2-part epoxy repair composites, such as Belzona 1111 (Super Metal), this flange repair kit provides a complete package solution that is cost-effective and simple to implement.

Flange Protection Using Belzona 3412
Belzona 3412 is a liquid-applied membrane system that offers long-term flange protection from exterior damages. The durable system can be used for pipe flange protection of different shapes, sizes, or configurations from crevice, galvanic and atmospheric corrosion and completely encapsulate the flange to exclude any moisture.
When used in combination with the release agent/corrosion inhibitor, Belzona 8411, the coating can be easily cut, peeled back, and resealed to allow inspection and maintenance of fastenings. Once the required maintenance has been completed, the membranes will fold back to their original positions and can be sealed with a further quantity of Belzona 3412. The system can be brush- or spray-applied.
How To Brush Apply Belzona 3412
Brush application of Belzona 3412 is a straightforward and effective method for flange protection, particularly useful for smaller or irregularly shaped flanges. This process ensures comprehensive coverage, providing robust protection against flange corrosion and other environmental threats.
Step 1: Clean the surface of the pipe and flanged connections to remove all dirt, grease, and other surface contaminants.
Step 2: Thoroughly abrade the surface with abrasive paper (sandpaper) or wire brush to remove all gloss and provide a good key for the Belzona coating.
Step 3: Apply masking tape over the two bond areas to protect the pipe areas from accidental overspray.
Step 4: To allow assess to bolts and flanges in the event of required maintenance, we recommend the application of Belzona 8411 by brush or spray. This also provides an optimum level of corrosion protection.
Step 5: Once the Belzona 8411 is touch dry, remove the masking tape.
Step 6: Re-apply fresh masking tape.
Step 7: To seal the gap between the flange faces, cut a strip of Belzona 9341 to the correct width and apply it over the gap.
Step 8: Fit plastic caps over the nuts/bolts.
Step 9: Empty the entire contents of the Belzona 3412 base and solidifier and thoroughly mix in the bowl provided for at least three minutes.
Step 10: Using a spatula, transfer the mixed Belzona 3412 to the flange face and bolts.
Step 11: Using long, light strokes, brush the material over the entire area ensuring it does not extend outside the prepared area.
Step 12: While the first coat of Belzona 3412 is still wet, bed strips of Belzona 9311 around the circumference of both ends of the pipe and the flange.
Step 13: Mix and apply the second coat of Belzona 3412.
How To Spray Apply Belzona 3412
Spray application of Belzona 3412 offers an efficient and uniform method for flange protection across larger or more complex areas. This technique provides thorough encapsulation of flanges, ensuring high-performance protection against flange corrosion and other damaging factors.
Step 1: Clean the surface of the pipe and flanged connections to remove all dirt, grease, and other surface contaminants.
Step 2: Thoroughly abrade the surface with abrasive paper (sandpaper) or wire brush to remove all gloss and provide a good key for the Belzona coating.
Step 3: Apply masking tape over the two bond areas to protect the pipe areas from accidental overspray.
Step 4: To allow access to bolts and flanges in the event of required maintenance, we recommend the application of Belzona 8411 by brush or spray. This also provides an optimum level of corrosion protection.
Step 5: Once the Belzona 8411 is touch dry, remove the masking tape.
Step 6: Re-apply fresh masking tape.
Step 7: To seal the gap between the flange faces, cut a strip of Belzona 9341 to the correct width and apply it over the gap.
Step 8: Fit plastic caps over the nuts/bolts.
Step 9: Empty the entire contents of the Belzona 3412 base and solidifier and thoroughly mix in the bowl provided for at least three minutes.
Step 10: Fill the cartridge of the Belzona Spray Gun.
Step 11: Spray the material over the entire area ensuring it does not extend outside the prepared area.
Step 12: While the first coat of Belzona 3412 is still wet, bed strips of Belzona 9311 around the circumference of both ends of the pipe and the flange.
Step 13: Mix and apply the second coat of Belzona 3412.
Belzona’s flange protection systems, including the Belzona Flange Face Forming Kit and Belzona 3412, offer comprehensive solutions to combat corrosion, erosion, and damage to flanged joints. By eliminating hot work and providing an easy, cost-effective application process, these systems ensure long-term flange-face protection and simplified maintenance, making them ideal for use on offshore platforms and in various industrial settings.
Contact Belzona to Learn More About Belzona 3412

Paola Chavez, born in San Pedro Sula, Honduras, holds a Bachelor of Science degree in Chemical Engineering from Florida State University in Tallahassee, Florida, United States. As a distinguished Technical Service Engineer at Belzona, Inc. based in Miami since 2021, Paola excels in providing comprehensive office and field-based application support, ensuring the optimal use of Belzona products across diverse projects.
An integral member of the Belzona Corporate Oil and Gas Team, Paola plays a pivotal role in business development, contributing her extensive knowledge to specifications, testing, approvals, and applications within the energy sector. Her expertise and unwavering dedication have solidified her reputation as a key contributor to the Team’s success and the broader industry. Indeed, Paola has provided application supervision and technical support across many different locations worldwide including North America, South America and the Asia Pacific region, amongst other places. In 2024, she delivered a seminar on Belzona’s cold bonding solutions at ADIPEC Downstream Technical Conference in Abu Dhabi.
In addition to her engineering prowess, Paola is an AMPP Certified Coatings Inspector Level 2 (Certification Number: 106760) and actively participates in the Association for Materials Protection and Performance (AMPP) through Belzona’s corporate membership. Her certifications underscore her commitment to maintaining the highest standards in materials protection and performance.


Hi There,
Thanks for sharing the blog and this great information. Which is definitely going to help us.
Well done.