
Introduction to Live Leak Repair
Live leak and through-wall defects on tanks are one of the major concerns in industrial operations. Tanks often suffer from corrosive content, and tough operating conditions, which contribute to internal corrosion, metal loss and wall thinning. This can eventually result in the leakage of hazardous materials, leading to production delays, environmental damage, and health and safety risks.
Asset owners have traditionally relied on conventional methods such as welding and brazing for tank leakage repair. However, such tank leak repair methods lead to consequential problems including bi-metallic corrosion in welds and seams, extended downtime, and can create unsafe environments for maintenance personnel.


Tank Leak Repair
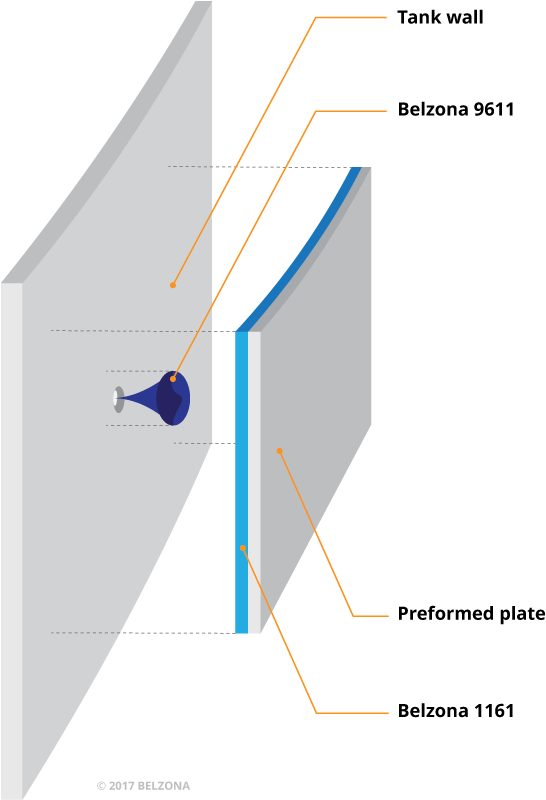
This blog post demonstrates an effective tank leak repair solution with Belzona 9611 (ES Metal), a rapid-curing putty. For a more permanent tank leak repair, Belzona recommends a cold-bonding technique using a preformed metal plate and Belzona 1161 (Super UW-Metal) as a bonding agent to overcoat the putty.
Asset owners can carry out this emergency repair while tanks remain online, enabling the operations to continue with minimal disruption and minimizing environmental damage. This application method can quickly repair water tank leaks or even address fuel tank leaks as Belzona 1161 (Super UW-Metal) is a surface-tolerant paste-grade material. It is specifically designed for applications on oily and wet surfaces, making it ideal for challenging operating conditions.
Supplies and Tools Required for Tank Leak Repairs


Step-by-Step Guide: How to Repair a Water Tank Leak with Belzona 9611 (ES Metal)
Step One: Surface Preparation
Prepare the surface by using a grinding file and remove any dirt, grease, and other contaminants around the live leak area.

Step Two: Prepare Belzona 9611 (ES Metal)
Cut off the required amount of Belzona 9611 (ES Metal) and knead it in gloved hands until a uniform grey color is achieved.

Step Three: Apply Belzona 9611 (ES Metal)
Use the Belzona applicator to force the mixed material into holes and firmly apply pressure.

Step Four: Allow the Product to Cure
Use a stud and a ratchet strap to secure the material in place until cured.

Step Five: Remove the Stud Once Cured
Once the product is cured, remove the stud from the tank.

Overcoat with Belzona 1161 (Super UW-Metal) for a Permanent Repair
Step One: Prepare the Surface
Roughen the area around the leak with a grinder to prepare for plate bonding.

Step Two: Clean the Repair Area
Clean the repair area with Belzona 9111 (Cleaner Degreaser)

Step Three: Mix Belzona 1161 (Super UW-Metal)
Mix Belzona 1161 (Super UW-Metal) as per the instructions for use until the uniform color is achieved.

Step Four: Apply Belzona 1161 (Super UW-Metal) Onto Tank
Apply Belzona 1161 (Super UW-Metal) directly onto the prepared tank surface. Press down firmly to ensure maximum contact with the surface.

Step Five: Apply Belzona 1161 (Super UW-Metal) to the Plate

Step Six: Form a Build Up
Form a build-up approximately 0.25 in (6mm) towards the center of the metal plate.

Step Seven: Position Plate on Tank
Push the plate into position, pressing firmly in the middle to push the material towards the outside to prevent air entrapment.

Step Eight: Remove Excess
Remove excess material immediately and use a Belzona applicator to contour the edges of the plate with Belzona 1161 (Super UW-Metal).

Step Nine: Remove Tape
Remove the tape once the application is complete.

VIDEO: How to Stop and Repair a Live Leak
FAQ
Can we use other Belzona paste-grade materials to overcoat Belzona 9611 (ES Metal)?
Other Belzona paste-grade materials can be used for tank leak repair if the surface is sufficiently clean, dry and roughened according to manufacturer’s instructions for use. However, Belzona 1161 (Super UW-Metal) has an additional advantage to displace fluid from the substrate, making it suitable for application on wet and oily surfaces as well as in underwater conditions with minimal surface preparation.
Is surface preparation required prior to the application of Belzona 9611 (ES Metal)?
To ensure an effective molecular weld, Belzona recommends roughening the area around the leak with a handheld surface preparation tool and removing any dirt, grease, and other contaminants before sealing the leaks with Belzona 9611 (ES-Metal).
Learn More
How to Repair a Riveted Tank with Belzona
Tank and Vessel Metal Loss Repair: Fast and Easy with Belzona 1161 (Super UW-Metal)
Learn More About Belzona Solutions for Tank Leak Repair

Richard Bywater is a Key Account Engineer at Belzona Ltd, one of the most established manufacturers of asset integrity solutions. With a Bachelor’s degree from the University of Leeds, Richard brings a unique blend of commercial insight and engineering expertise to his role.
His career at Belzona, beginning in 2018, has taken him around the globe, delivering talks, leading training seminars, and providing hands-on support to some of the world’s largest energy companies. His work focuses on implementing Belzona’s simple, safe, and effective solutions, ensuring optimal performance and longevity of critical assets. Over the years, Richard has been responsible for securing specifications for Belzona products with major energy suppliers, promoting a sustainable maintenance ethos within these companies.
Richard’s extensive travel and on-site experience have made him a highly sought-after expert in asset integrity, particularly in mitigating erosion and corrosion issues.

